yep; a 100 messages already! crazy, eh? And I just started this blog on Jan; 5th - a bit more than 4 months ago. crazy, eh? (I know I said it already ;-)). Thanks to all of you visiting this blog. thanks for the sweet messages, thanks for the comments, thanks for encouraging me. thanks to you,I feel less alone in front of my sewing machine...
Anyway.... to celebrate, I thought I'd give a tutorial a try... and that wasn't easy!
I decided to redo with you the bag I made here, for my mother. I hope some of you like the idea! I hope also you won't just thing that is all soo easy, what's the point. And I certainly hope you'll undersatnd somethingas I am still a beginner sewer and I am not always sure the English I use is totally proper (most of the technical terms I use I learned from reading you all so, thank you!)
OK, enough said... Let's get to work!

 This case/bag here is 18cm large, 15 cm deep and 16cm high
 What we need:
Outside fabric (here, green linen):
- 1x - 62 x 18 cm + 1cm overlap = 64x20cm (this large strip is the front side, the botton, the back side and the top)
- 2x 15 x 16cm + 1cm overlap = 17x18cm (both sides)
Inside fabric (pink & grren cotton (yes again ;-))):
- 1x - 62 x 18 cm + 1cm overlap = 64x20cm
- 2x 15 x 16cm + 1cm overlap = 17x18cm
- for the pockets: 2 x 18x20 cm + 1cm overlap = 20x22cm
- for the handles: 30x8cm
- for the outside: 62x18cm + 2x 15x16
- for the handle: 28x6cm
- for the pockets: 2x 9 x 18cm
Fleese if you want it to be "cozier":
62x18cm + 2 x 15x16cm
1 zipper min. 48cm long

1. Fuse all wht must be fused: the outside, the handle and half of the pockets

2. I you wish to decorate the outside, do it now. I just added this crochet doily but I trust you to have great other ideas
Don't hesitate to mark the different parts on the large strip (see my purple line)

3. Fix the fleece on the inside - Here, I decided to form this 5/5cm squares

4. The inside pockets:
- Fold the large side in 2. visible sides on the inside. sew along the lon side, turn around and topstich close to the edge
- Locate the bottom on the large strip.
- Pin each pocket with the seam alongst those lines
- Sew on the sides (real close to the edges) and in the bottom (on the lines marking the bottom of the bag)
- If you wish to make smaller pockets, sew in the middle. For a stronger result, I always stitch twice.

5. The handle:
• Fold and iron the overlap of the long edges to the inside - right side facing down.
• Fold in 2 and iron • Turn around (to have the right sides facing in the inside).
• Sew the short edges
• Turn around and topstich all around

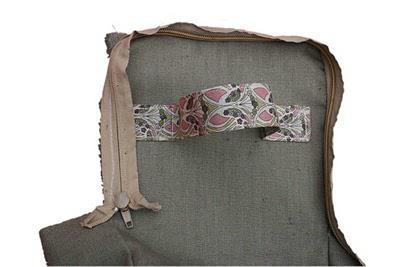
- On the long strip, locate the center of the top and mark - on each side - a 4x3 cm cross 4cm from the center (cfr photo)

- pin and sew the handle


6. Put the outside together
Sew the side pieces on the large strip - along the front, bottom and back sides - with the good sides of the fabric facing eachother

 Turn around and look how nice it is ;-)
7. Sew the inside together the exact same way but LEAVE ONE SIDE OPEN so you can turn the whole thing around at the end!!!

8. put the zipper on the top
watch out, this isn't very scientific ;-)
- Place the top - right side up - flat in front of you
(the body of the bag lays between you and the top) - Place the zipper on top of it - opening to the right - face down.
- Pin all along - marking the angles

- Sew with the zipper foot of your machine on

- On top of that, pin and sew the top of the inside fabric - right side down. (You can - of course - sew the 3 elements (zipper + outside + inside) together but it is really not that easy to correctly sew the zipper in the angles as it is and I fear it would even be harder without seeing what you're doing)

- Turn around and OPEN THE ZIPPER!!!

9. Assemble the other side of the zipper
- Put the outside fabric in the inside right sides facing - with, between the 2, the top turned the right way out
- Pin the other side of the zipper between both fabric - starting at the end. Make sure the both ends of the zipper remain apparent (note: the zipper I used is an reused one. that's why it is so long; yours should only be 1 or 2cm longer)!

- Sew all around
10. Turn it all outside out through the opening you left in one of the inside's sides and sew this one closed

11. Put treasures in it, take pictures and send me those ;-)
 And if you have questions or suggestions, pleeease contact me and say so!!
and find other nice stuff here:


